When I was first learning to sew it was always so scary and intimidating to do certain things outside of the basics. But had I just gone for it and learned it a lot sooner, I could have really taken my art to the next level, instead of always procrastinating that learning curve out of fear.
The sooner you figure it out, it’s not so hard. Don’t be so scared to do it. Just go for it, go learn it. Because the sooner you learn it the sooner you can make dresses with zippers and buttons and your technique will really look more professional. It’s all in the details.
Here are some tips and tricks that will improve your sewing skills just a little step further. It’s that step that helps you to really get it down. Produce a better product with new and improved features and details. And help with your general learning and skill mastering.
I’ve arranged these from least difficult to most. That being said, mastering the first few really helped take my art that one step further, so don’t think just because it’s a little less difficult that it isn’t worth learning.
This post may include affiliate links.
Please read my disclaimer page for more info.
*As an Amazon Associate, I earn from qualifying purchases.*
One: Straight Stitching
If you’re new to sewing and need some tips for keeping your stitch straight and neat, this one’s for you.

To be sure the needle is going exactly where you want it to go, find the arrow on your straight stitch foot, or where the sewing foot splits, this is meant to be your guide.

As long as you’re using one of the regular straight stitches, no matter how large your stitch is, this is where your needle is going to go. Use this as a reference when you follow rolled hems or the edges of your fabric.

I usually line my straight stitch foot along the edge of the fabric and follow that, but sometimes that’s not a good enough spacing for my stitch. In that case, find a reference point so you know where to follow to keep the stitch straight, then keep an eye on the arrow of the foot. For example, I’ll follow the edge of my folded hem instead of lining the foot up with the very edge of the fabric.
Two: Presser Foot

If you find that you stop mid-sewing and sometimes pull the garment around to get a better angle or to check on things and then you start sewing again and your stitch gets wacky. Make sure the needle is down before you lift the presser foot up, move your fabric, then put the foot back down.

If you don’t put the foot back down when you go to make your next stitch the needle and fabric will shift and things won’t be lined up and pretty anymore. The same happens if you move the fabric without the needle being down, your stitch will never line up exactly where you want it to again.
I’ve done this a few too many times and the results are always ugly.

To reiterate, make sure the needle is down, in your fabric, before the foot is lifted, or else your fabric will shift and things will get messy. Lift your foot, shift your fabric. Then make sure the foot is returned to the down position before you start sewing again.
Three: Thick Fabric Troubles
Do you ever get stuck and your stitch gets wonky when you try to go over a thick area of fabric? Maybe it’s a seam under a rolled hem that you’re trying to sew over and getting the foot on top of it and then back off is causing troubles.

I have a solution to this! You simply need to level the foot out so the fabric and foot are the same height. To do this make sure your needle is down, in your fabric, then lift your foot and stick something underneath. I like to stick my ruler underneath, it’s flat and the perfect height to lift the sewing machine foot.
Then return the foot to the down position and continue with your stitches. Make sure you’re not doing any back stitching onto the ruler. You may have to scoot it forward a little as you go, but you shouldn’t be using it for very long, just long enough to get over the large lump of fabric.
Four: Gathering

To gather, sew a loose stitch without backstitching. My biggest straight stitch number is a 10. Sew a straight line as close to the edge of your garment as you can get, you can also just line your foot up along the edge of the fabric, I haven’t decided which is better.
Again, do not backstitch at any point during this stitch.

Once you finish the straight line leave a long tail of thread when you cut it from the machine. You’re going to use these to gather. Holding one of the two strings pull and scrunch the fabric.
By holding one of the strings and not both you should be able to easily gather the fabric up, depending on how thick your fabric is. Try not to break the thread.
Gathering on heavier fabrics, like denim, or long garment pieces, are more difficult and could result in breaking your thread, so go slow.
If you do break the thread, you can either remove the previous stitch and sew a new line, or sew a small line from the spot it broke to the nearest end of the garment. If you break just a small section you could gather it by hand as well, as long as that section is no bigger than maybe 3.25″ (8cm) you won’t notice it on the finished garment.

For the best gathered effect, always double the width of the fabric you want to gather. The bigger it is the better the ruffles will be. If you’re adding tiers to, for example, a dress, each fabric panel will need to be double what the piece before it was to accomplish this gathered effect.
After your gathered garment has been sewn into whatever you’re sewing it to, you can remove the gathered stitch–AFTER–it has been sewn in place. If you use a matching thread you won’t notice it much at all and can avoid this tedious task. But for best looks you should remove it, being careful not to remove the stitch attaching it to the garment.
Five: Overlocking Dupe
You can do a zigzag stitch instead of overlocking to clean finish areas that tend to fray. I don’t know why but this took me forever to figure out the best way to make this actually work.
To do this we have to make sure the needle goes off the edge of the fabric. You don’t want the needle to be up by your original sewing line that connected the fabric pieces, you want to be on the edge of the fabric.
I find the best success when I put my zigzag stitch on the biggest zigzag stitch option, on my machine this is number 4.

Align the arrow on your straight stitch with the very edge of the fabric, half of the foot will be hanging off the fabric. I follow the edge of the fabric but sometimes move it in by like the width of a pen tip.

Doing this your needle will go off the fabric and then back and it will grab the fabric, creating a fake overlock stitch.

Sew your stitch all the way along your fabric. Remember to put the sewing machine back into your straight stitch before heading back to your regular sewing.
Six: Buttonholes
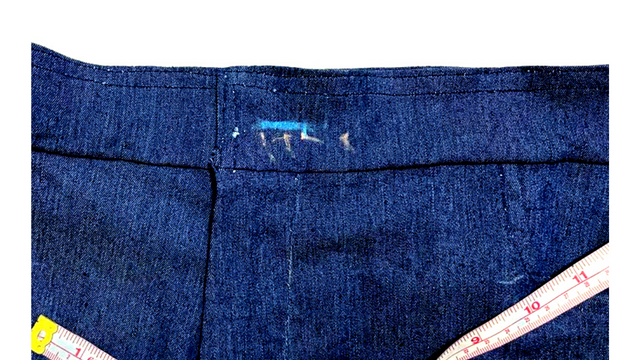
Determine the button spacing needed for your garment. I usually refer to a similar item as a reference and copy the layout.
Measure your button to determine the size of the buttonhole you will need. You will want your buttonhole to be a touch bigger than the button itself, to ensure the button can move in and out of the hole with ease.
Measure the width of the fabric you’ll be attaching the button(s) to and find the center and/or spacing. You will also need to determine whether your buttonhole(s) will be vertical or horizontal. Create a straight line with fabric chalk that is very visible to you, a little longer than your button.

On your sewing machine, you should have a section for creating buttonholes. B, AC and D.
B creates a row of stitches on the left, D creates a row of stitches on the right, and AC creates the stitch in-between to connect the buttonhole at the top and bottom.
Technically the sewing machine instructions say you’re supposed to go backward first, however, I do mine in the wrong order because that seems completely ridiculous to me.
Sew your buttonhole by lining up your button foot directly on this line. Buttonhole feet don’t have a backstop–at least mine doesn’t–so pay extra attention when doing the backward left stitch and make sure you stop at the same place you started. This is where following the line we make comes in handy.
We will not be backstitching at any point.
I recommend you sew the buttonholes slowly, not just to ensure you stop at the proper place, but to ensure the buttonhole you create is a thick stitch. If you go too fast the stitches will be too far spaced.
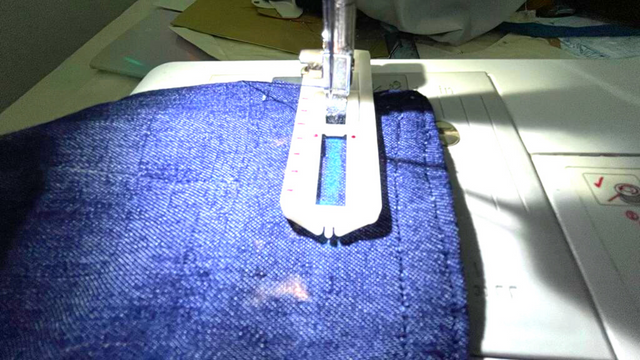
Starting from the back of your line, move the nob to D, which is the forward position. Sew until your buttonhole foot reaches the stop at the front.

Make sure your needle is up and change to AC. Sew this a few times.
Lift the needle and change to the backward stitch option, B. As you’re sewing this keep a close eye on your fabric so you stop exactly where you started.
Lift the needle, change to AC, and sew the rear connecting line between the two rows.
Cut open your buttonhole, being careful not to cut through your stitches. You can determine where to put the button by using fabric chalk and making a small dot through the hole.
Seven: Invisible Zipper

Installing an invisible zipper may be the most intimidating thing on this list, but with this technique it’s not as hard and scary as it appears and the finished results are fabulous!
I tried three or four different zipper installation techniques before settling on this as my favorite and most successful.

Fold your fabric in half, with good sides facing at the spot where you want to insert the zipper. You can see the pins on the right side of the fabric in this picture.
Create a basting stitch (A stitch on your biggest stitch setting, no need to backstitch) along the length of it. Make sure you are sewing far enough from the edge so that you create two flaps that are wide enough to fit your zipper on when the seam is folded and ironed open. Measure your zipper width if needed.

Iron your seam open and lay your zipper on your seam, the good side of the zipper facing down. If your garment has a waistband, make sure the top zipper stopper lines up with the crease of your waistband (the crease is there because the waistband will fold in half), or wherever your zipper is starting on your garment.
Pin your zipper in place on both sides of the seam. Make a mark 2.50” (6cm) up from the very bottom of the zipper, this is where we’ll stop sewing. You can see a little blue dot underneath a blue in on my zipper in the photo.
From the 2.50” (6cm) mark, pin the rest of your fabric below this mark and sew with your regular straight stitch to finish the bottom half.
Remove the basting stitch that goes up from that 2.50” (6cm) mark, but do not remove the pins. Close your zipper to ensure everything lines up correctly before we sew this in place.
Unzip the zipper and put your zipper foot on the sewing machine. On both sides sew the zipper in place as close as you can get to the actual zipper teeth. You can pull the teeth out of the way with your finger while you’re sewing if this helps you to get closer to that line. Be careful not to catch the actual zipper teeth with your needle otherwise your zipper will be unable to zip up.
Close your zipper to ensure everything is in place and proper. If the item you are sewing has a waistband, finish the waistband however you choose, being sure to tuck the top zipper flaps out of the way and hide them in the waistband.
That’s all of my sewing tips for today. I hope you found these tips and techniques helpful! Let me know in the comments if you have any questions, or want to share what project you next plan to use one of these tips on!
These techniques were game-changers for me. Especially the zippers and overlock dupe! No longer am I required to create tie straps or suffer with fraying fabric on my projects-I have options!


