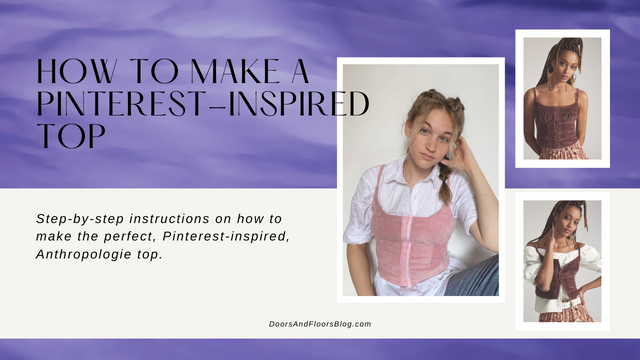
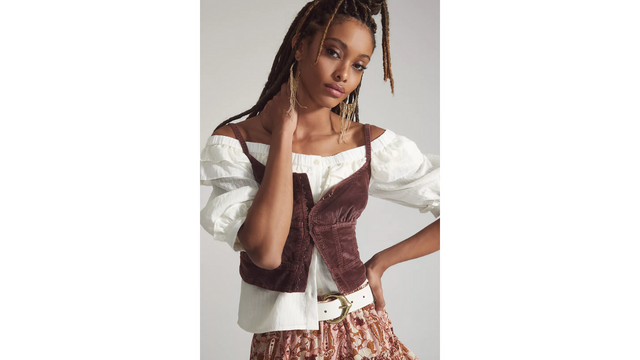
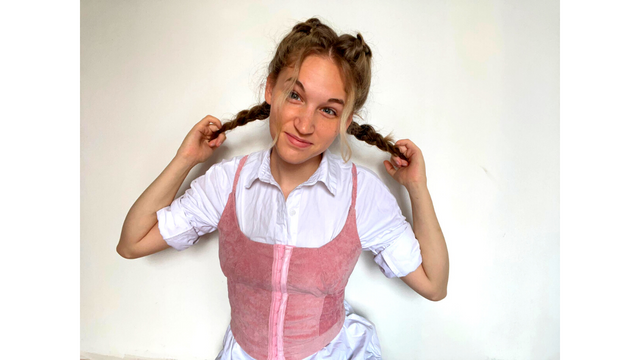
I’ve had this one corduroy, Anthropologie top in my Art Ideas Pinterest board for quite some time and I recently decided to give it a go. This will by no means be a perfect tutorial, nor an easy sew.
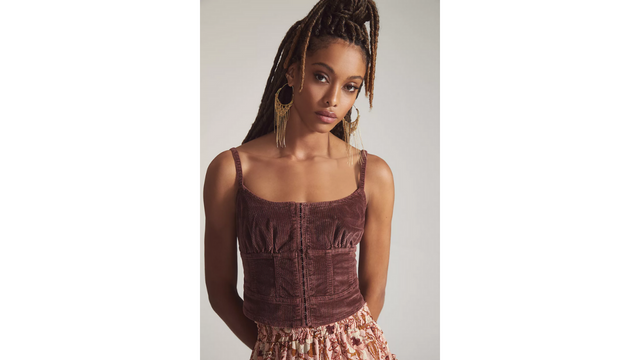
If you don’t mind a challenge and you’re interested in creating this Anthropologie top, keep reading for the step-by-step instructions! I will have lots of tips and tricks along the way from everything I learned while trying to sew this top.
This post may include affiliate links.
Please read my disclaimer page for more info.
*As an Amazon Associate, I earn from qualifying purchases.*
Approximate time to completion: 13 – 15 hours
Days spent working on it: 7 – 9 (Spread out across 2 or 3 weeks)
What you’ll need:
- Corduroy fabric, I used scrap fabric. Less than a meter. Honestly probably less than half a meter.
- Matching thread
- A sewing machine
- Fabric tape measure
- Overlocking machine (optional)
- Hook and eye tape in a matching color to your fabric
- Straight stitch foot
- Zipper foot (optional)
- Scissors
- Fabric chalk
- Sewing pins
- The sewing pattern
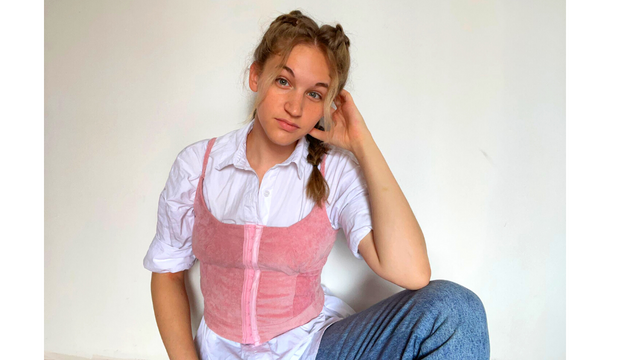
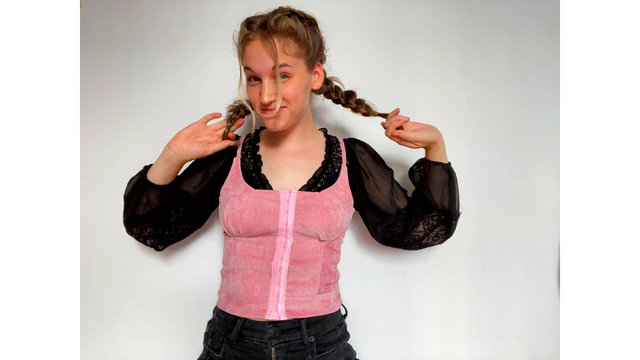
Disclaimer: I am trying to teach myself the Metric System, so I will always try to include both measurements in my tutorials, i.e. centimeters and inches, meters and yards. Though I have been using them interchangeably in my everyday sewing life lately, I apologize if I miss including both or switch between the two too often.
Prep Work For Your Anthropologie Top
I am the type of person who just jumps in and creates and figures it out as I go. I don’t like to create three different test patterns, it feels like a waste of fabric to me. I would rather make it once and tweak it to perfection than waste fabric making three different tests that I will never end up using. When I figure out something that will be easier for you, I try to put it at the start of the instructions instead of in the middle–which is usually when I figured it out–to make the process a little easier for you.
Before you start making this Anthropologie top, please first follow the instructions for making the pattern in this blog post, then come back here and we’ll have very detailed instructions on sewing and tweaking the pattern.
Make sure that you cut your fabric with seam allowance, if you did not include that in your pattern-making process.
I would also suggest that you zig-zag stitch or overlock all of your pieces right now before you start, so you don’t have to remember to do it as you go like I did. And you won’t have to keep switching between stitches.
Sewing The Bottom And Middle Pieces
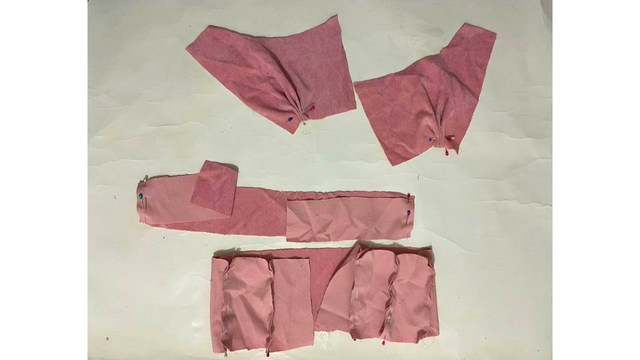
Step one of this Anthropologie top tutorial is to start by pinning the good sides together of all your front middle pieces. I pinned the three left half pieces together and then the three right half pieces together. Attaching the two to the back piece, but not together in the middle. This is the bottom item in the picture above.
Go ahead and use this same pinning method with your bottom piece if you cut three pieces, the two side pieces need to be pinned to the back middle piece. If you only cut one long strip, hang tight, we’re not ready for it yet.
At this same time, we’ll create the pleats for the cup pieces.
Measure the bust piece from the shoulder side, in by about 1” (3cm) and make a mark with your fabric chalk or a sewing pin. This is where you want your first pleat to start. I created four pleats, or gathers, I’m not sure what the technical term for these would be in this case.
I did fold them like you would a pleat, taking a section of fabric maybe .50” (1cm) or .75” (2cm) wide and folding it over on top of itself, creating a pile or collection of pinned and gathered/pleated fabric. Be sure to use lots of pins to keep them in place so they don’t run away.
Sew all of these pieces in place, the middle portion of your Anthropologie top, the bottom portion, and the cup pleats.
Decorative (And Necessary) Stitching
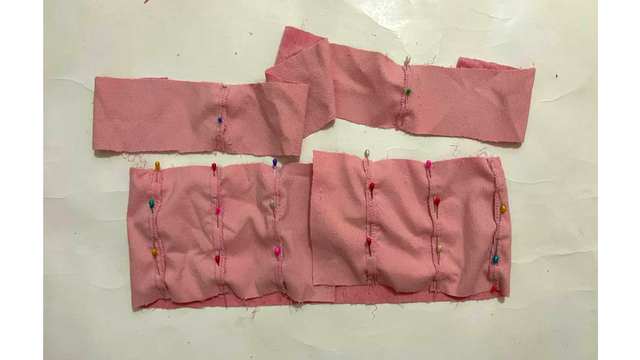
Now that they’re sewn together, pin down the seams on your middle and bottom pieces. Pull them tight to make sure they lay flat before you pin. We’re going to sew this down so that there will be two rows on each seam, as you can see in the inspiration photo of the Anthropologie top.
Pro Tip: I like to pin the insides down because I want to make sure I sew a straight line. I know most people usually tell you to top stitch so you can make sure it looks good from the outside, I don’t like to do it that way. I always miss sewing the piece of fabric that’s in the back. If you pin and sew it from the inside you can create a perfect straight line and make sure you catch the excess fabric flap.
Finishing The Bottom Half Of The Top
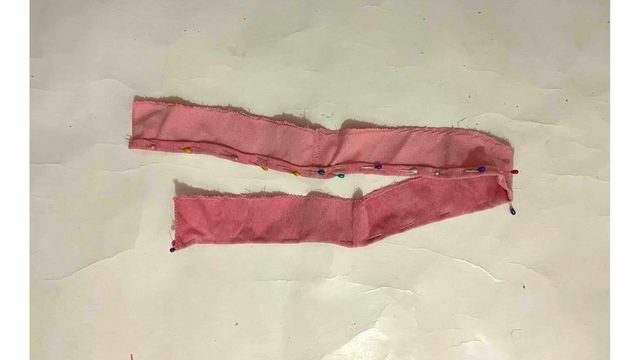
Create a rolled hem on the very bottom piece and sew the rolled hem as close to the edge as you can get. You can create a second row if you want to follow the theme of everything else, however, this is probably the only place I didn’t create a second stitch on.
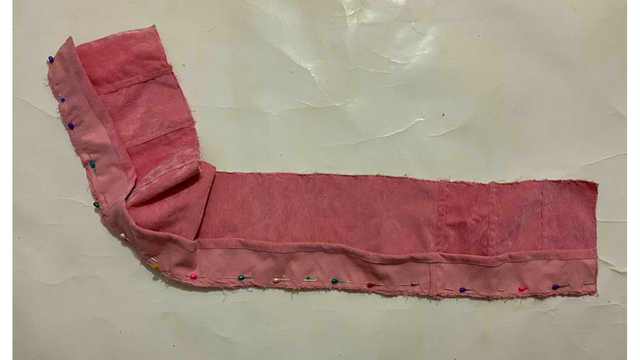
Pin your bottom panel to your middle panel, with good sides facing, and sew.
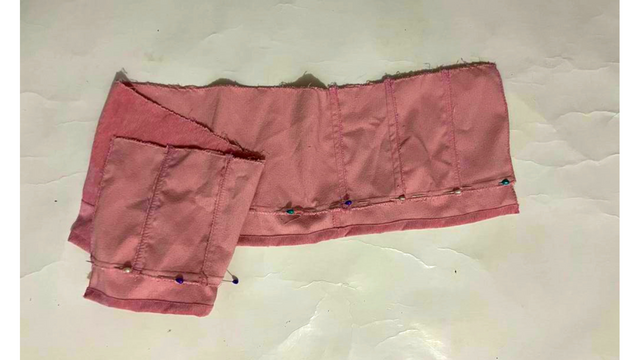
Fold the sewn edge down, pin, and sew to create that second row.
The Top Piece And Bust Section*
*Please read the complete instructions for sewing the top and bust section of your copycat Anthropologie top before sewing or cutting anything.
For the top pieces, we’ll need to cut facing to finish all of the edges. I did these in a bunch of completely random orders because I was just going as I figured it out, so here are the complete instructions all at once. You will need one piece for the top back piece, one for each curve on the front piece, i.e. the armpit side and the front of the cup. A total of five facing pieces.
Before you cut the facing for all the pieces, we need to determine two things.
First, The straps
If you haven’t already, cut your straps.
I really wanted mine to be skinny, however, corduroy is thick and hard to turn right side out, so I did cut them a little thicker than I wanted to…but, I later ran into another problem and I ended up making them smaller. We’ll go over this shortly.
Cut two long strips of fabric on fold, preferably a little longer than your desired shoulder strap length, just to be safe. The width is up to you. I wouldn’t recommend bigger than 1” (3cm) on fold if you’re going for something similar to the straps in the Anthropologie top. But if you’re comfortable sewing something smaller, I highly recommend you cut it as small as you’re comfortable going, as the Anthropologie top has some cute, dainty straps.
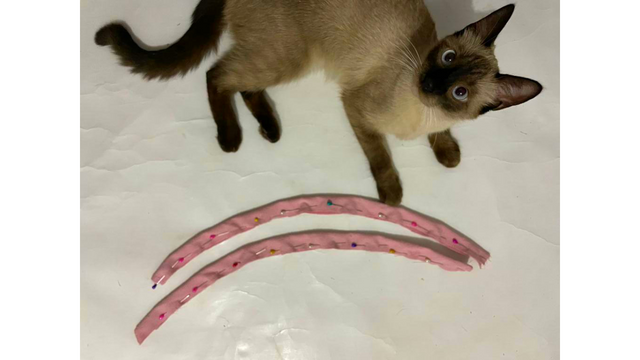
Take your straps and fold them in half, good sides facing, pin, and sew. Trim any excess fabric from the seam without getting too close to the stitch you just made, and turn the straps right side out.
Second, The Armpit Curve
The armpit line is going to need some facing and a curve for the actual armpit spot. The curve was not included in the original pattern-making process.
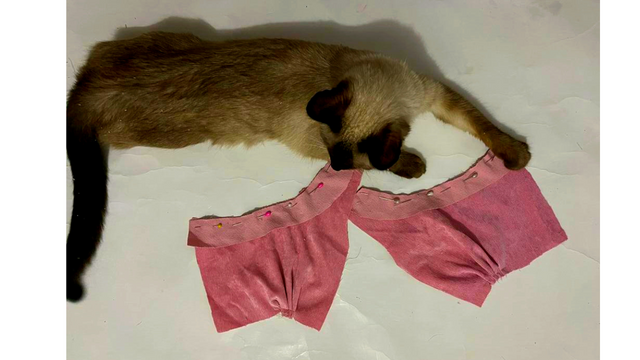
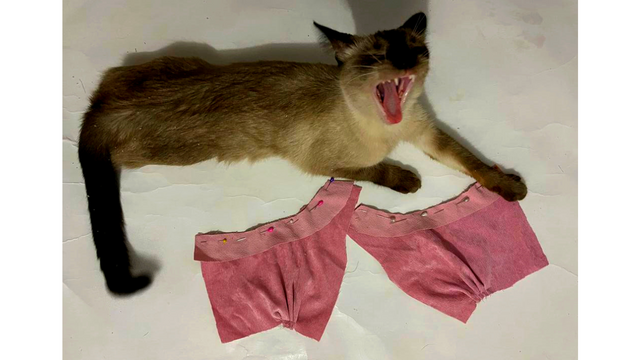
Before you cut the fabric to curve the armpit spot you need to sew the facing on the top of the cups. You can see how it looks pinned in place in the above picture, right below my cat’s elbow. Please see the section below titled “Cutting The Facing” for instructions on, you know…cutting the facing.
The reason why you need to sew this in place first is because the facing gets sewn on good sides facing, and then is flipped over, pinned, and sewn again. If that doesn’t make sense to you as a good reason why it needs to be done first, it’s because you lose some of the surface of the fabric to the seam allowance. You will lose that .50” (1cm) of fabric off of both ends of this strap curve.
Here’s where I messed up, again.
I laid my strap on top of my cup piece along the finished edge of the top at the strap spot and eyeballed the curve of the armpit and I trimmed to the exact width of my strap. The problem is, as I said above, when you add the facing you will lose .50” (1cm) of fabric off of both ends of this strap curve.
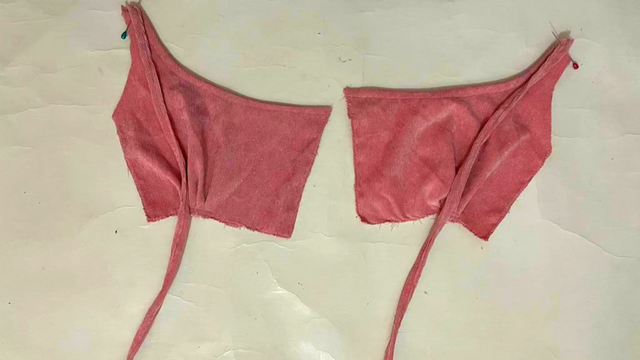
If you want to keep your straps the width that they are, you will need to trim the armpit curve leaving .50” (1cm) of excess fabric on the unfinished edge so that you can add the facing, fold it over and the top will curve to the exact width of your strap, for a more professional, perfect look. As shown above. Note, the above photo was my fixed solution, not the oops.
If you make this mistake like I did, cross your fingers, hold your breath, and keep reading for my solution to this oops.
If your strap is now too wide to perfectly align with the curve of the top at the finished result, you will need to trim about .50” (1cm) off of your strap.
I debated cutting a new strap and throwing these to my scrap pile, but I wanted to try something first.
So I attempted to fix this by folding the already finished straps in half and pinning them. As I expressed above with my concern about corduroy being really thick and hard to turn right side out, I was concerned that sewing this would be too thick and that I would break a needle. Apparently not concerned enough, because again, I could have just cut new fabric and started over.
It actually worked and I did not have any issues at all! The straps are thiccck. With three C’s. But work perfectly, and you don’t even notice once they’re sewn into the top. Also, sewing them into place wasn’t too hard either. Though I did need to use a trick mentioned in this Sewing Tips And Tricks post to help with sewing over thick fabric.
After you’ve cut your armpit curve with the added seam allowance on that side, then go ahead and cut your facing.
Cutting The Facing
To cut the facing I laid my back panel and top pieces on top of some extra fabric and cut around the shape of it. You can remove your piece from on top and cut out the rest of that with about 1.50” (4cm) of space around it.
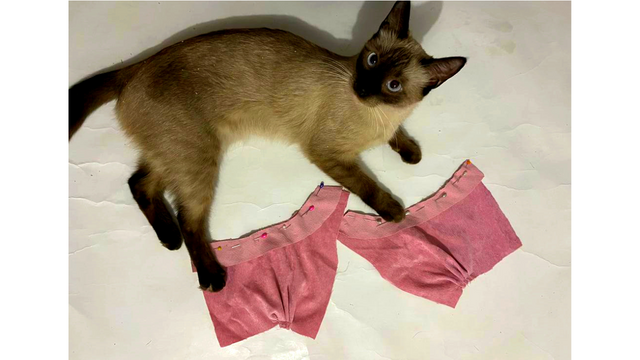
The first facing piece you will need to sew is the very front piece on the cups. Take your facing and lay it good sides facing, pin and sew it.
Snip the rounded edges of the facing before flipping the facing over, this will help it to lay better.
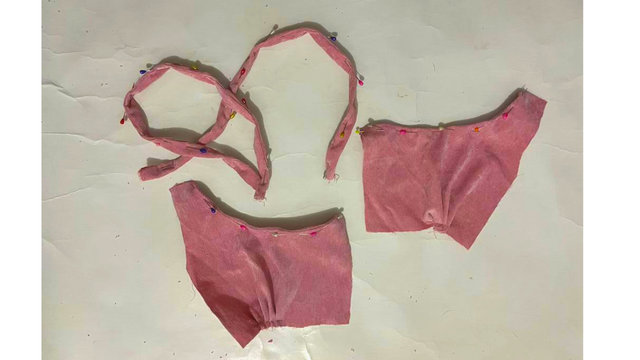
Then flip it over, pin it and sew it again to give it that decorative stitching.
The Armpit Facing And Front Straps
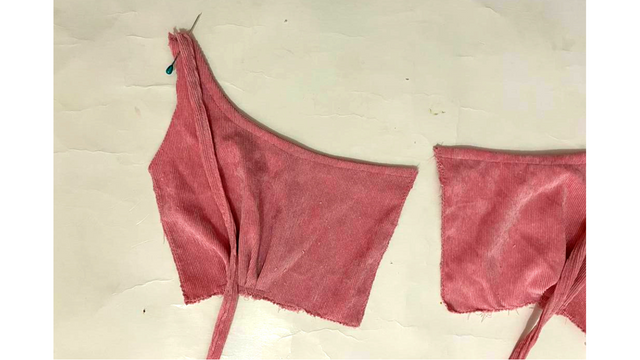
Take your strap and pin it with the strap side going down, into the top. Make sure when you pin your straps you have at least .50” (1cm) of overhanging fabric.
I put a stitch in the strap so it stayed in place, you could just pin it and then pin the facing on top of it if that’s easier for you, but I wanted to be able to tug the strap out of the way so I didn’t accidentally sew over the side of it.
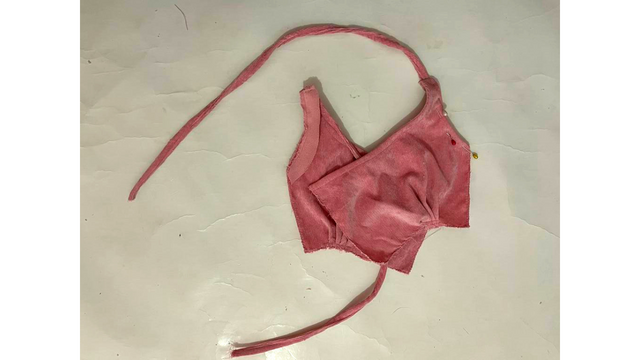
Lay your facing piece for the armpit side good side facing down and pin it in place. When you sew this go along the armpit side and across the top edge of the strap, make sure you only sew the top edge of the strap. The left top piece in the photo above.
Remember to snip the rounded edges of the facing before flipping the facing over, this will help it to lay better.
Flip the facing piece over to the back side, pull out the strap, pin and sew the facing down to add a matching decorative stitch. Go slow over the strap pieces as they are thick. Try to make sure the decorative stitch connects with the decorative stitch on the other side. The right top piece in the photo above.
The Back Straps
Lay your facing piece good side facing your back piece and pin it in place.
Please note that this step in making the Anthropologie top can only be completed after the front strap pieces have been completed. If you haven’t done the front straps yet, you will need to come back to this.
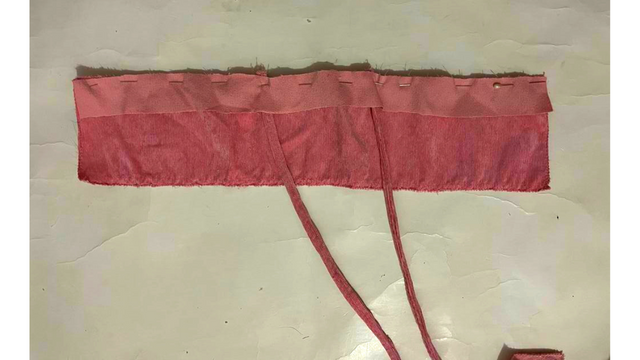
For the straps on the back piece, we’re going to sandwich the straps in between the back piece and the facing for a clean finish.
To get the proper length of the straps you’re going to need to pin them in place and then try it on to make sure the length is right. You need to be extra cautious that the straps don’t get twisted before you’ve had a chance to sew them in place.
To make this easier on yourself, first, take your measurement from your armpit to where you want the straps in the back to hit. For me, this was somewhere around 7” (18cm) give or take 1″ (3cm). I marked it with some fabric chalk.
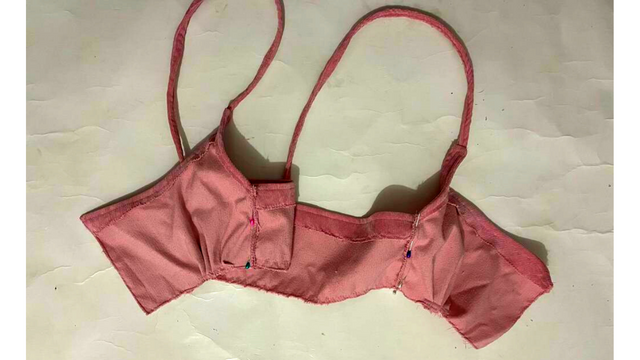
Next, pin the cups to the side seams of the top back piece, we’re not sewing them together now, just pinning them in place so we can eyeball the strap length. This is where the pinning gets a little confusing. The straps need to be pinned so that they hang down, into the top, the same way we did with the straps on the front, but you need to keep the straps from getting twisted. It will take some playing with.
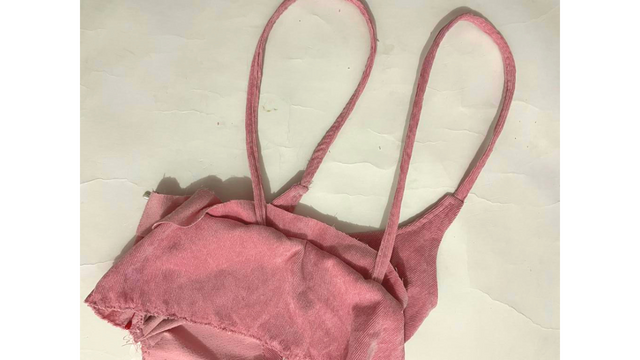
Once you get the straps pinned in place without being twisted, try on the top, grab some fabric chalk and go to the mirror, or get someone to help you. You’ll want to pinch the straps until they are the ideal length and they feel like they sit nicely on your shoulders. Mark this with your chalk.
To make the straps even I measured the length of the strap from the cup piece to the chalk mark I made and made an identical mark at that length on the other strap. Then I pinned them in place right at that length. I measured a second time to make sure they ended at the same length.
Make sure when you pin your straps in place that you have at least .50” (1cm) of overhanging fabric. After you pin these in place try to check that the straps are all hanging straight again. Do not cut anything until you’re absolutely sure that the length is good and the straps are not twisted. I didn’t cut the excess strap piece until long after they were sewn in place.
I realize that checking to make sure everything is straight and not twisted while everything is pinned in place and upside down is a little difficult since nothing is sewn down yet, so just remember that we are going to add a decorative stitch after we sew this facing in place. I highly recommend that you sew the facing and straps in place, but before flipping the facing over and sewing the second stitch row, pin the side seams in place and try on the top again and make sure the strap length is good and that the straps are not twisted.
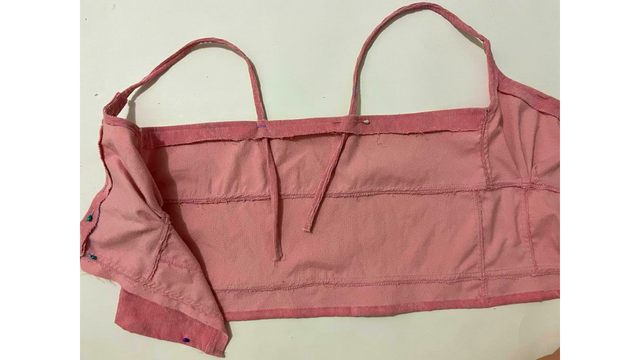
Once you’re sure these are good, then you can flip the facing over, pin it and sew your decorative stitch. Believe me, you want to check that before sewing the decorative stitch, seam ripping that piece is not fun–I had to do it so I could fix my straps.
Shown above. Seam ripping two 1″ (3cm) spots of fabric in the middle of my Anthropologie top to fix the length of the strap, after the decorative stitching had been added. This spot alone took me an hour and a half to seam rip.
All that to say, though tedious, really take the time to check your straps before sewing that final stitch. You can flip the facing over and eyeball everything if it makes it easier. Even seam ripping a little hole for the straps after you’ve sewn the first stitch is a good idea if you need to because seam ripping through one layer of stitches isn’t too hard.
Assembling The Anthropologie Top
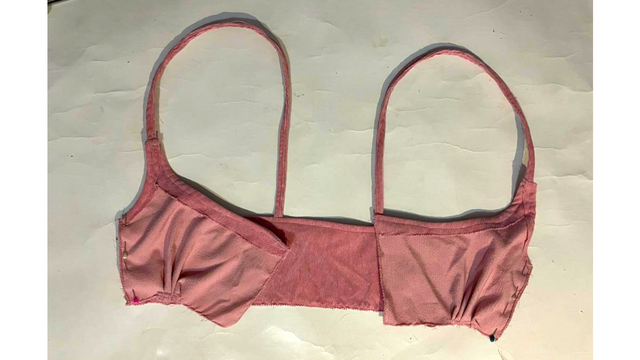
With the straps all good to go, pin your top back panel to your cup pieces at the sides, with good sides facing. Do one last check that your straps are laying perfectly before you sew this in place in case anything needs to be tweaked. Then sew.
Fold down the seams and pin in place, then sew these as well.
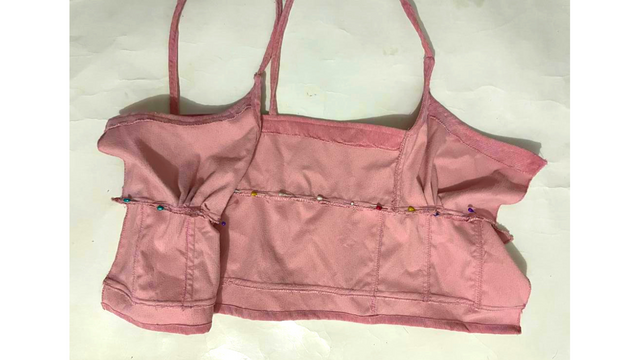
Attach your bottom piece to the top piece, with good sides facing and sew along that whole edge. Sew your second, decorative stitch along the folded seam to complete the look.
Hook And Eye Closure Installation
For the hook and eye closure, I struggled at this section. The installation itself is not that difficult, but I didn’t have a hook and eye closure to begin with, so I put in an invisible zipper as I was in a hurry.
That was a disaster. Completely and utterly.
I will give you the proper instructions for inserting the hook and eye closure to your top, and a necessary step that I learned the hard way.
The Most Important Step Before The Finish Line
Before you Install your hook and eye closures make sure you try on your top to make sure that the cups–most importantly–actually fit. If you don’t you’re just inviting sewing drama, and believe me, after all those extra, perfect stitches, you don’t have time for two days of seam ripping.
I had to seam rip twice…but I gave up halfway through the second time and just cut off the pieces. I did not have another two days to spare.
Just in case you have any of the problems I had, I have included an additional fix that wasn’t included in the main instructions when you get to the end of the project. But I am hoping that you will read all the steps now and you won’t end up with any additional problems.
Not to be all dramatic, but this top was not an easy sew-or to seam rip for that matter!
Back on topic, you need to try it on before you attach the hook and eye closure, or else your cups will be too big for your breasts…or maybe I’m just small-chested.
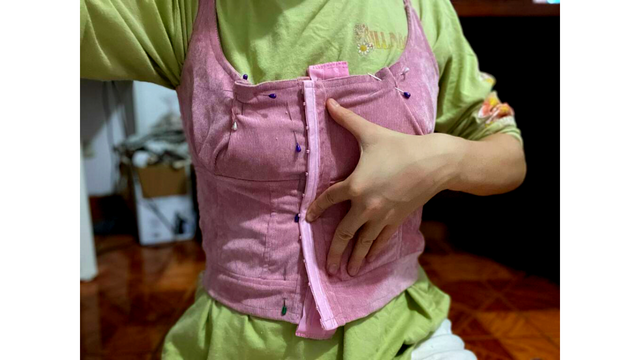
When you try it on, pull it tight to see where the hook and eye closures need to sit. You can see in this picture that I tried it on and marked with my pins where the closures needed to go.
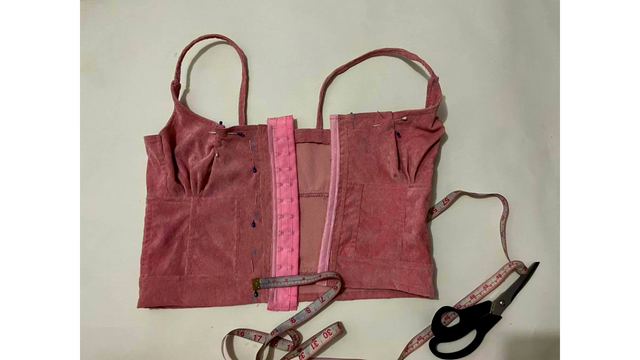
Trim your top down to fit where your pins were marked. I measured the amount that needed to be taken out, which happened to be even on both sides, I believe I removed 1.50” (4cm) from both sides. I drew a few marks at that measurement and cut. Do not add any seam allowance back in.
Also, a little apology to anyone who now has too much seam allowance in the front per my instructions in the previous post How To Make A Sewing Pattern For The Anthropologie Top. However, I don’t want to update the instruction to remove the added length, because it’s safer to have too much fabric than to have too little. And who knows, maybe you need that as we have different body types.
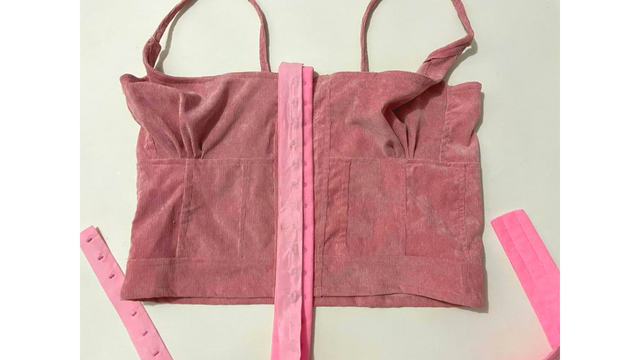
You can use a single-row hook and eye closure style if you prefer, mine has a double row as that was the only kind available in pink. And they did not have different shades available, my color options were very limited.
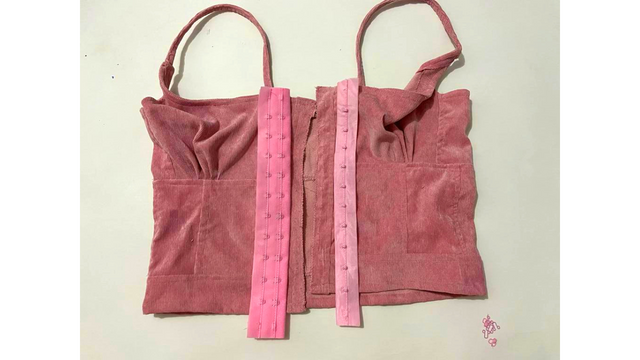
To install your hook and eye closure first trim the length of your tape to fit your top. Make sure the hooks and eyes are connected when you cut so they are cut to the same length. Remember to add a little overhang as we will need to fold the top and bottom edges under and sew them down for a clean finish. I had to remove a few hooks and eyes to be able to have the extra space on the tape and so that the hooks and eyes didn’t start at a funny spot.
If you had to trim your top down in the middle like I did, zig-zag stitch or overlock the raw edge in the middle.
To make sure everything lines up evenly in the middle, attach the hook and eye closures together and open up the little flap on the eye side of the tape. Sandwich the top in between the tape and pin the left side of your top first. I find it easiest to start at the top edge and leave a little overhang, about .50” (1cm), then pin that whole piece down. Make sure you don’t accidentally pin the hook side of the tape.
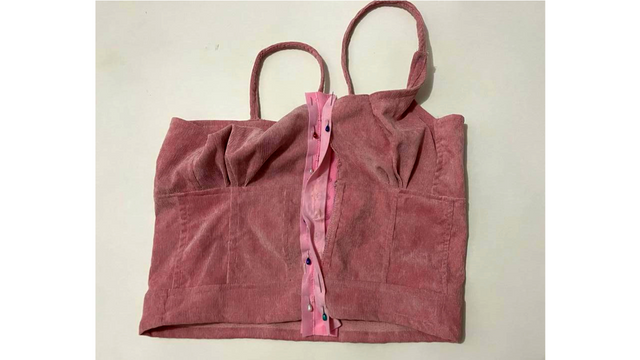
Next, with the hook and eye still attached together, take the right side of your top and fold the hook tape in half around it.
Start by pinning the top and bottom edges. Make sure the top and bottom edges of the top line up perfectly in the middle before pinning the rest of the tape in place.
After you’ve pinned the top and bottom edges you can detach the hook and eye tape and finish pinning and sandwiching the top in between the hook tape.
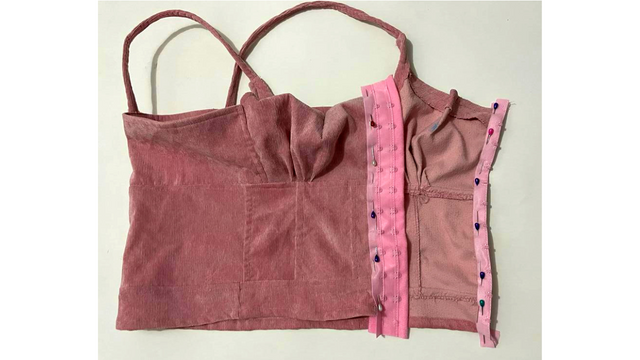
Not to completely undo all of the work, but after the hook side was pinned in place I switched my pins to the side with the hooks, the inside of the tape, so it was easier to sew. Notice in the picture above how the hook tape is pinned on a different side of the fabric than the eye tape.
Before you sew anything, attach the hook and eye tape at the center once more and confirm everything lines up perfectly.
To sew on the tape I used a zipper foot so I could get closer to the hook and eyes. I created two lines to make sure everything was secure. You should sew the line on the very edge of the tape first to hold everything in place. Make sure you go slow, you do not want to sew over a hook or eye and break your needle.
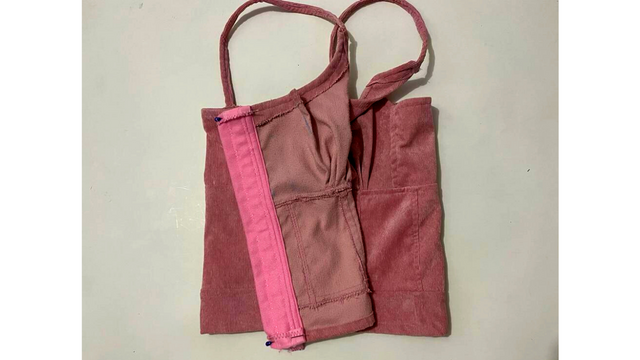
Finally, fold the top and bottom edges to the inside and sew them down for a clean finish.
And officially, your copycat Anthropologie top is finished! Que the internal screaming!
Troubleshooting: Cup Issues
I really struggled with getting the cups to hug my body properly. I inserted and removed a zipper and installed hook and eye closures not once, but twice in an attempt to get the cups to sit just right.
Fixing the cup part alone was two days of struggling and wrestling with what to do. But I am so glad I wrestled with it for so long and didn’t just give into the first half-hearted fix I found. The end result is fabulous and I’m so proud of it!
If after all of the steps above you still struggle with a little bit of gapping in the bust section of your Anthropologie top, you can add a little dart.
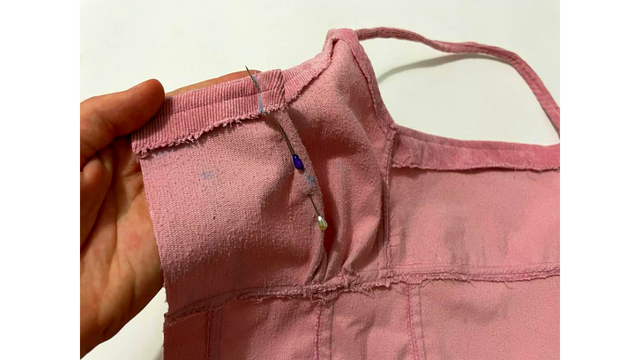
I added a dart at the very top of my cup that was created at 3.50″ (9cm) in from the armpit side. My dart was .60″ (1.5cm) wide on the fold, by 2″ (5cm) deep, pointed down in the direction of the nipple. Pin and sew like you would any other dart.
You can trim off the excess fabric and finish the raw edge if you want. I left mine, but I may go back and trim it later if I find it bothers me.
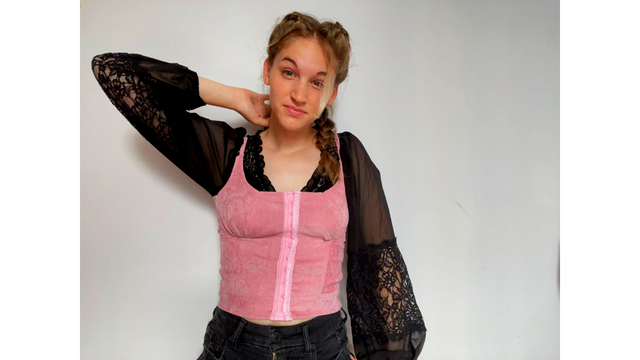
By sharing all the steps I took to correct my mistakes, I’m hoping that if you decide to try making the Anthropologie top, you won’t experience any of the difficulties I did.
But, if you find yourself confused with any of my instructions or you run into another issue, let me know in the comments what you’re facing and I’ll do my best to assist!
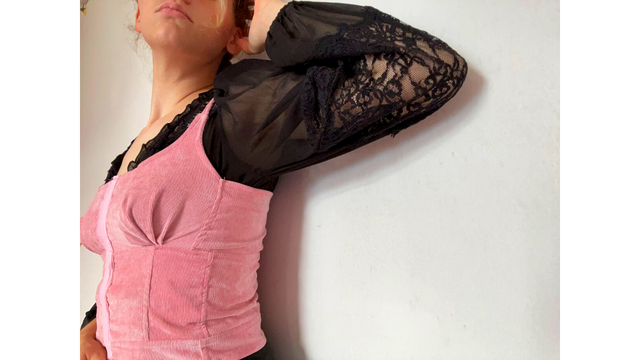
I could have done a better job of lining up the side seams here-but I refuse to take any criticism on this top. I am SO proud of how it turned out. No criticism, please. I will not be listening.
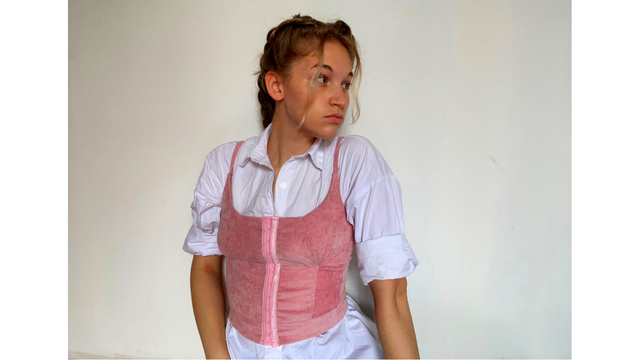
So what do you think, will you give the Anthropologie top a go?
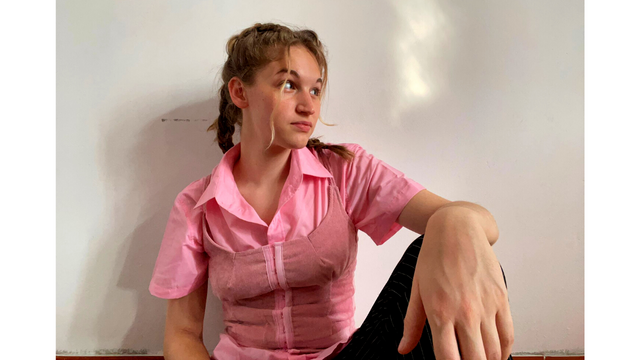
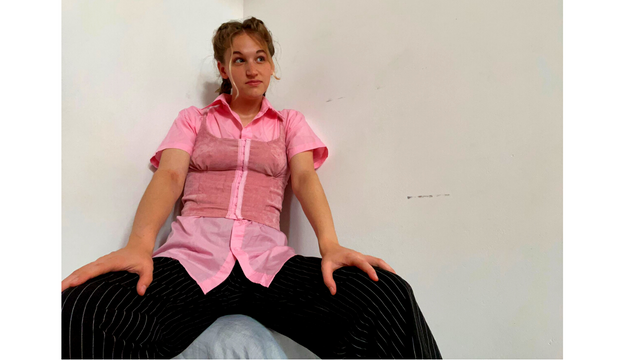
If you decide to give this project a try, tag me on Instagram @doorsandfloorsblog and use the hashtags #SewingCat, #PursuingInterests and #D&FBlog so I can see what you make!
Heads up, in the future when we discuss Pursuing Interests next, we’ll have a special guest post by my sister, as she takes you through one of her creative adventures.
Explore other recent posts:
- Remote Work Life in Perú: Introducing The Chickens
- How To Make A Kids Scrap Fabric Top: Design #3
- The Truth About Working Remotely In Perú
- How To Make An Eyelet Top Out Of Scrap Fabrics: Design #2
- 10 Interesting Restaurant Culture Shocks From Eating Out In Perú
Find us on social media!
P.S. Looking for a fun activity you can do with a friend while working on tedious crafty tasks, download our free trivia here.
Playing trivia is a great way to keep your mind active and have fun with your crafty friends and family while busting out those seam ripping, crocheting, and other time-consuming, but necessary, crafty tasks.
