Preparing to bring in the New Year, my family and I decided to camp out on the beach. It’s almost summer here in Perú, and already super hot. We’d been excitedly planning this adventure all week.
We prepared by packing extra food, clothes, and fishing rods. The plan was for the nine of us to stay in a cabin on the beach, fishing and playing in the sun. We packed veggies and rice, but for meat, we ate what we caught…and a chicken…because sometimes you just don’t catch enough fish or lapas to feed nine people.

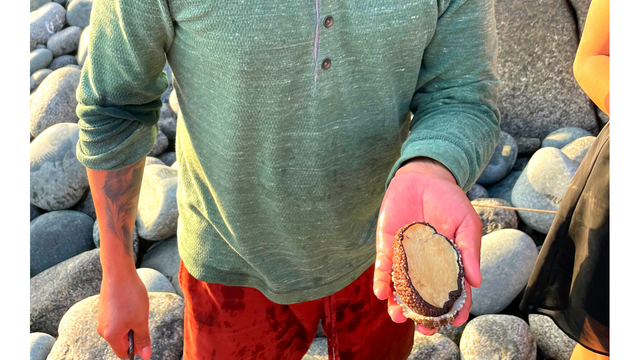
Also, in case anyone is wondering, this is a lapa. We like to find a bunch of them and make sudado out of lapas, or you can fry them. They’re basically a sea snail.
My husband and brother-in-law prepared for our trip the night before by actually making the fishing rods. The process fascinated me, and honestly not a complicated project to put together. So I quickly grabbed my camera and started documenting the process.
If you need a simple solution to avoid going out and buying a fishing rod. Here’s how we make fishing rods in Perú.
This post may include affiliate links.
Please read my disclaimer page for more info.
*As an Amazon Associate, I earn from qualifying purchases.*
Approximate time to completion: 40 Minutes
What you’ll need:
- Scrap board, about 4×6
- An electric saw – two kinds
- Clamps
- A sturdy surface
- A drill – with different drill bit sizes
- Screws – possibly
- A sander – electric preferred
- Ruler
- Pen
- Fishing line
- Fishing hooks
- A weight to attach to your line
- Bait

Disclaimer: I am trying to teach myself the Metric System, so I will always try to include both measurements in my tutorials, i.e. centimeters and inches, meters and yards. Though in my everyday sewing life lately I have been using them rather interchangeably, I apologize if I miss including both or switch between the two too often.
Measuring and marking your board

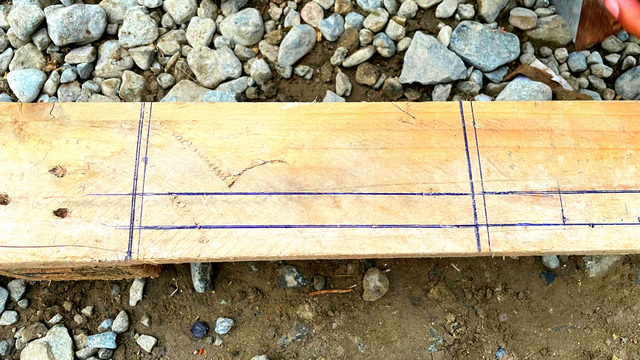
Using your ruler draw a line 8″ (20cm) from the end of your board, the two vertical lines in this photo. At the center of the board, move over by .75″ (2cm) and draw a straight line. From the nearest edge closest to this line, move in by .75″ (2cm) and draw another straight line, the two horizontal lines in this photo.

Mark at the center of your line on your board. From the center dot, go 1.50″ (4cm) to the left and from the center, dot go 1.50″ (4cm) to the right.
This is going to be the hole for your hand, this will vary depending on the size of your hand. I would recommend you start with these measurements, cut the hole, and test how it feels on your hand. And if you feel you need something a little larger, shave a little more wood off with your saw. Small amounts at a time, you can never add it back on.

Using your saw, cut your board apart from the larger piece. This picture shows what it should look like before cutting.

Draw a slight curve on both ends. We eyeballed it, but be sure you don’t make it too much of a curve otherwise the fishing line won’t work with it properly.

Drill four holes at the handle spot to make it easier to create the curve of the handle then cut out this hole with your saw.

Sand your board and round out the curve on both ends. Sand the handle as well so you don’t get splinters when you hold it.

Drill a hole for the fishing line to go through later.
What to do if you break the board

If you break the board in half you might still be able to save it.

Drill four holes into the center of the board.

Then screw the two pieces of wood together. Be sure to sand everything out to make it flawless.
Attaching your fishing line

Feed your fishing line through the hole on your fishing rod and make a knot to secure one end in place. Wind the fishing line around the curved edges of your fishing rod. Attach your weight and fishing hook. The fishing hook should be about 8″ (20cm) away from the weight.
Now we fish!

We use mole crabs as bait.

To cast your line hold the fishing rod in one hand, swing the line over your head like a slingshot, and release. Then wind it back up again when you feel the fish tugging.

I hope you found this article helpful and that you’ll give it a go! This fishing rod tutorial is great if you’ve been considering trying fishing but don’t want to go out and spend all the money to do so. Let me know in the comments if you have any questions about the process!
Also, do you like these kinds of DIY projects? I tend to do sewing tutorials, but I’m curious if you’re interested in more practical DIY’s from my daily Perú adventures. Let me know!
If you decide to give this project a go, tag me on Instagram @doorsandfloorsblog and use the hashtag #Doorsandfloorsblog so I can see what you make!
Explore other recent posts:
- The Best Place To Thrift In Perú
- How To Make A Gingham Gathered Exposed Ruffle Skirt
- How To Make Elastic Or Drawstring Waist Shorts: Design #4
- Remote Work Life in Perú: Introducing The Chickens
- How To Make A Kids Scrap Fabric Top: Design #3

Find us on social media!
P.S. Looking for a fun activity you can do with a friend while working on tedious crafty tasks, download our free trivia here.
Playing trivia is a great way to keep your mind active and have fun with your crafty friends and family while busting out those seam ripping, crocheting, and other time-consuming, but necessary, crafty tasks.


