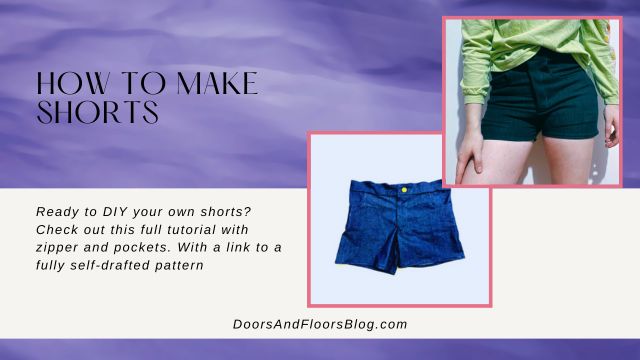
Today we’ll make our own shorts, custom-made to fit exactly the way we want. They come with front and rear pockets, a front zip, and belt loops if you fancy them.
In this tutorial, I will be jumping between two pairs of shorts, and they are of slightly different fits as I made one for my sister and one for myself. Please excuse the color changes of the fabric between pictures, I wanted the best of both worlds for the pictures to ensure the steps were being properly explained, so that meant pulling from both collections of pictures.
Are you ready? Let’s get sewing!
This post may include affiliate links.
Please read my disclaimer page for more info.
*As an Amazon Associate, I earn from qualifying purchases.*
Approximate time to completion: 6-7 hours
Days spent working on it: 4-5
Time estimates are calculated based off of: A spare hour or two I could squeeze in after a work day.
What you’ll need:
- Fabric, approximately 1.09 yards (1 meter)
- Matching Thread
- Stud button/jean button
- Make sure you get the one that can be installed via hammer, something like this
- Pants zipper, approximately 7″ (18cm) – 9″ (23cm) depending on the desired rise of your shorts
- Scissors
- Sewing Machine
- Zipper foot
- Buttonhole foot
- Straight stitch (or quarter-inch) foot
- Shorts sewing pattern
- Fabric chalk
- Fabric tape measure
- Sewing pins
- Hammer
- Iron
- Ironing board
Disclaimer: I am trying to teach myself the Metric System, so I will always try to include both measurements in my tutorials, i.e. centimeters and inches, meters and yards. Though in my everyday sewing life lately I have been using them rather interchangeably, I apologize if I miss including both or switch between the two too often.
Front shorts pockets
Cut all of your pieces out using the pattern we made in the previous blog post, How To Make A Sewing Pattern For Shorts. I recommend waiting to cut your waistband strips out until later, as mentioned below.
Start by overlocking or zig-zag stitching the raw edges on the front pockets. I put this here because I did this after I sewed all of the pocket pieces in place, and it was difficult to reach certain corners.
While you’re doing this, go ahead and overlock or zig-zag stitch the raw edges on the zipper flaps, both pieces of the front of the shorts, down the crotch seams, and the back shorts on the rear seam and back detailing. When you overlock or zig-zag stitch the zipper flaps make sure that the one that gets folded in half is folded wrong sides facing, you want the pretty side out.

Take your front pieces and your larger pocket pieces and line them up together, good sides facing and sew. Cut along the rounded edges, being careful not to go through the stitches you just made. Cutting this will make it fold easier and more seamlessly.

Fold over and sew along the top to create a detailing stitch and to ensure the piece stays in place. I find it easier to sew with the smaller piece of fabric on top.


Pin the other two pocket pieces together, good sides facings and sew.

Then line up the pocket pieces, good sides facing and sew a little stitch along the top and side to secure in place. Make sure the back of the pocket piece lines up evenly and straight across with the front as this becomes the top front edge of your pants.

Finally, pin and sew the pockets together, be careful not to sew the shorts in this step, only the pockets.
Back shorts pockets

If you’re adding the back detailing, pin the flap in place and sew. Ideally, you also should have cut this piece out of the same direction of fabric that you cut the rest of your pieces. I don’t know what I was thinking when I cut my fabric, but the grain line definitely doesn’t match.

Fold over and sew along the sewn edge of the flap to create a detailing stitch and to ensure the piece stays in place. If you flip it over and view it from the right side, this little detailing stitch makes a huge difference! 10/10 would recommend.
Pin the rear shorts together at the booty seam and sew.
Note: If you added darts to your sewing pattern, this is the point where you’ll want to pin the two points together and sew.

Fold down the top edge of your rear pockets by .50” (1cm) and sew in place. Fold the new edge down by 1.25” (3cm) and sew in place.

Prep the rest of the edges by ironing and pinning them to hold in place. Make sure you get the bottom corner edges even, this took me a few tries.

Lay your back shorts panel flat and measure from the top waistband line down by 2.50″ (6.50cm) and make a few marks. From the center booty seam measure in by 1″ (2.50cm). You can firm out your marks if desired.

Taking your pocket piece line it up along the top line, using the corner where your two lines meet to find the first placement. Don’t place your pocket along the vertical line, you’re using the corner and the horizontal line as your guidance. Pin this in place. From the corner placement pull the pocket flat across and pin the the other top edge where that lands, pin the rest of the pocket edges where it sits flat.
Then sew two lines, one as close to the edge as you can get, and a second line the proper width of your straight stich foot. There should be two lines on each pocket, ensuring security and providing aesthetically pleasing looking pockets.
Front shorts zipper

Moving on, take the good side of the fabric of your front shorts, the one with the crotch seam facing the left, and place your zipper flap with the curved edge facing the right, wrong side facing up. Then sew this in place along the crotch seam.
Fold the flap over to the left and sew along the folded edge.

Take your zipper and place it good sides facing, lining it up along the folded edge you just sewed. Line the bottom of the zipper up with the bottom of the flap, you want the zipper flaps at the bottom to hang off the end just a little. Sew a straight stich down the left side of the zipper.

Then fold the zipper underneath the shorts along the folded edge that the zipper was lined up along. Sew an outer decorative zipper stitch just outside the zipper underneath. Do not sew through the zipper. I cut a slightly smaller zipper flap out of fabric and traced it onto my pattern to make it easier to sew this line.
Note that you are NOT sewing where the pins are in this picture, I just wanted to keep the zipper in place. Sew along the white line, and again, be sure not to sew the zipper.
Please see the note below about sewing the bottom curve of the white chalk mark in the picture above before you sew this.


Before you sew completely around the outer edge of the zipper, we are going to catch the zipper’s flap with our needle in one place. When you get to the bottom corner when sewing the decorative stich, at the very bottom of the zipper where the two little flaps are, catch the inner flap with your needle, but grab the outer one and tuck it out of the way to keep from catching it with your needle. Complete your stitch to the end.

Take your second zipper flap, with the folded side facing the inside of the short and line it up along the crotch seam. Sew along the bottom two layers, the zipper and back flap only. Be sure to tuck the front flap out of the way before sewing.
The pin at the top of the inside of the shorts in the picture is only there to keep the back zipper flap from getting screwy while I sew. Do not sew this.

Take your second short piece and fold the crotch seam under by .50” (1cm). Line up the folded edge along the left side of your zipper. Be sure to double check that the top of both of your shorts lines up evenly before sewing this in place. Sew this along the folded edge, stopping at the end of the zipper flap. When you get to the bottom of the zipper stop pull the folded edge out and sew straight along your overlocked edge to the end instead of the along the fold. This will help us as we attach the crotch seams in the next step.

Fold the top side of the shorts at the crotch seam in by .50” (1cm) and pin it in place on top of the other crotch seam.

It’s easiest to start at the end of the crotch seam, and work your way up to the end of the zipper. Then sew along this, stopping at the sewn curve of your zipper flap.

Fold your front short in half, good sides facing. On the inside of the shorts where the two zipper flaps come together, sew a small stitch, about .50” (1cm), along the bottom right corner of the flaps. This will make sure the flaps stay connected when you open the zipper.
Waistband and side seams

Place your front and back shorts pieces good sides facing and pin first the crotch seams, then the sides. Sew this together starting at the crotch. Overlock or zig zag stitch the raw edges on the sides of the shorts if they haven’t already been clean finished.
Before you cut the waistband out, measure your shorts pattern to ensure you have the proper length. Take your measuring tape and measure all around the top of your shorts, including both zipper flaps. Cut your desired height by the width of your waistband plus 2” (5cm), just to be safe.
Look, I had waistband problems. Learn from my mistakes!

Iron both sides as well as lengthwise on one end on both waistband strips.
Pin one waistband piece good sides facing all around the waistband, be sure to pin on the folded corner edge, the lengthwise ironed edge should be on the bottom and not pinned or sewn now.
Pin the second waistband piece on the inside, good side facing the inside of the shorts. Then sew these together. Cut and fold the edge in if your waistband is too long. I wait to cut until I’m about 5” (13cm) from sewing the last of the waistband to be sure everything fits properly.

Fold the two waistband pieces up and pin on the ironed edges together. Sew two lines on the waistband, one on the very edge, as close as you can get, the other the proper width of your sewing foot.
Button and hemming

Measure the width of your zipper flap and divide by two to determine where to put the buttonhole. Then measure how deep your waistband is, and measure your button. Then create a straight line that is very visible to you, a little longer than your button.
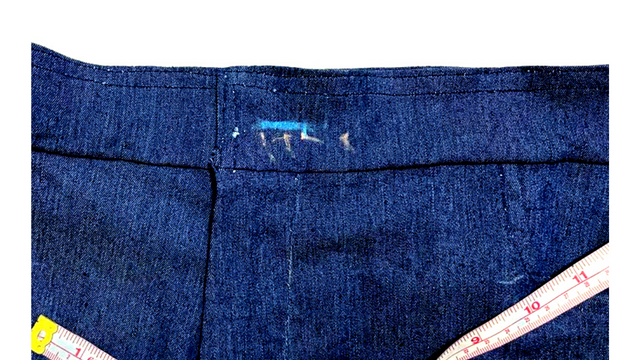
Sew your buttonhole by lining up your button foot directly on this line. Buttonhole feet don’t have a backstop–at least mine doesn’t–so pay extra attention when doing the backward left stitch and make sure you stop at the same place you started. This is where following the line we make comes in handy.

Cut open your buttonhole, careful not to cut through your stitches. Then take your chalk and make a mark through the hole to determine where to put the button.

On the dot you made on the back flap, poke your nail through the hole, place the button on top of the nail.

With button side to the floor, take your hammer and connect the two. Be sure not to hammer too hard, incase the nail goes through the button and ruins your shorts. No pressure.

If your shorts are not even at the bottom, determine where you want your shorts to end. Trying them on is the ideal way to decide this. Then cut a straight line across to even them out

Create a rolled hem around each leg and sew in place.
When I tried my shorts on I noticed everything fit perfectly except the waistband. To fix it I added a dart to the center seam of the shorts, 3.25″ (8cm) wide by 5″ (13cm) long. If you need this take the number you need to remove and make sure to divide it between the center seam. Fold the shorts in half and sew down the triangle. Cut off the extra fabric after you’ve tried it on one last time and clean finish the raw edges.


That’s it, you’re done! Congratulations, you did it!
Unless of course…you want belt loops. I did not do them, but a quick explanation of what you’ll need to do is cut out your strip of fabric 19.75” (50cm) long by 1.25” (3cm) wide. Iron this so two sides fold into one long strip and sew along the edge.
Cut this into five equal pieces. Pin two on the front, one on the back and one on each side, good sides facing. Sew a small stitch to secure in place then fold up, tuck the top corner down and sew in place.
Let me know in the comments how your project goes or if you have any questions!
If you make this project, tag and DM me on Instagram @doorsandfloorsblog so I can see what you make! Remember to use the hashtag #DoorsAndFloorsBlog
Explore other recent posts:
- Remote Work Life in Perú: Introducing The Chickens
- How To Make A Kids Scrap Fabric Top: Design #3
- The Truth About Working Remotely In Perú
- How To Make An Eyelet Top Out Of Scrap Fabrics: Design #2
- 10 Interesting Restaurant Culture Shocks From Eating Out In Perú
Find us on social media!
P.S. Looking for a fun activity you can do with a friend while working on tedious crafty tasks, download our free trivia here.
Playing trivia is a great way to keep your mind active and have fun with your crafty friends and family while busting out those seam ripping, crocheting, and other time-consuming, but necessary, crafty tasks.


